Enkel Boks + Paxton
Wiring diagrams for Enkel Boks and Paxton Net2 plus and Paxton10, with the controller in the central cabinet and one 6-pair cable to the door. The reader is connected directly to the controller with its own reader cable (max 100 m), not through the box.
Paxton Net2 plus – controller in the central cabinet
The Paxton Net2 plus sits in the central cabinet and runs on the same 24 V power supply as Enkel Boks, and one 6-pair cable (max 100 m) runs to the door. Relay 1 is a dry NO contact to terminal 9, the night lock is controlled by the time relay in the central cabinet, and the Paxton reader is connected directly to Reader 1 with Paxton reader cable, not through the box. Pair 6 and terminals 13–16 are free.
Download wiring diagram (in Norwegian): Paxton Net2 plus – controller in the central cabinet (PDF)
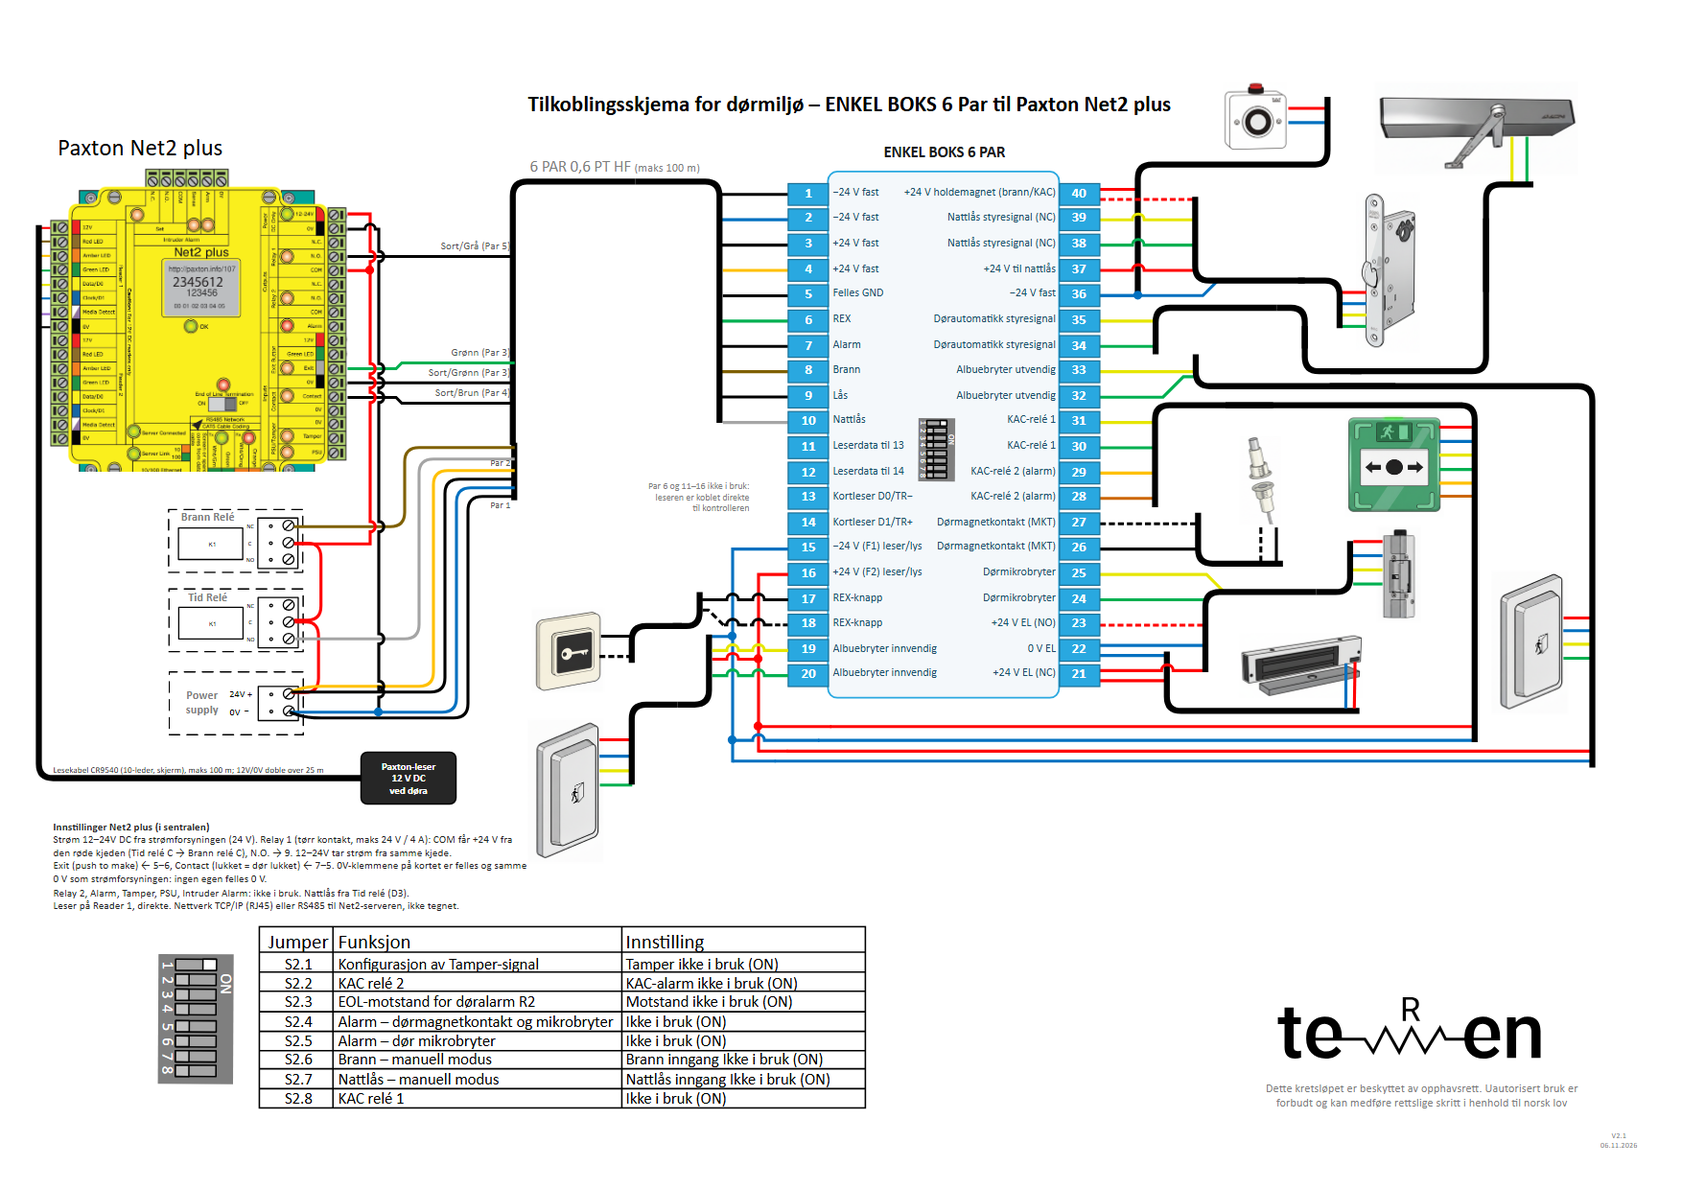
- Lock: Net2 plus Relay 1 N.O. → terminal 9 (Black/grey, pair 5); Relay 1 COM gets +24 V via time relay C and fire relay C.
- Inputs: 5 (Black/green, pair 3) → Exit Button 0V, 6 (Green, pair 3) → Exit, 7 (Black/brown, pair 4) → Contact (closed = door closed). The 0V terminals on the board are common.
- Power: Net2 plus 12-24V from the power supply, 0V → the power supply's 0 V. One power supply, so common 0 V follows automatically. The Net2 plus draws max 200 mA.
- Reader: Paxton reader (12 V only) on Reader 1 with Paxton reader cable CR9540 (10-conductor, screened), max 100 m; 12V and 0V are doubled over 25 m.
- Night lock: time relay NO → Grey (pair 5) → terminal 10. Relay 2 is not used.
- The power supply and battery are sized for Enkel Boks, Net2 plus and reader together.
Connection table (cable journal)
Cables
- 6 PAR 0,6 PT HF (max 100 m): Central cabinet (Net2 plus, power supply, fire relay, time relay) ↔ Enkel Boks
- In the central cabinet: Power and bridges in the cabinet
- Paxton reader cable CR9540 (10-conductor, screened) (max 100 m): Net2 plus Reader 1 ↔ Paxton reader at the door (not via Enkel Boks)
One row = one conductor: terminal in Enkel Boks → conductor → where it goes. The tables are translated from the PDF, which is in Norwegian; the PDF is the document to install from.
| Terminal | Function | Conductor | Connects to | Note |
|---|---|---|---|---|
| 1 | −24 V constant | Black/blue (pair 1) | Power supply 0 V (−) | |
| 2 | −24 V constant | Blue (pair 1) | Power supply 0 V (−) | |
| 3 | +24 V constant | Black/or. (pair 2) | Power supply +24 V | |
| 4 | +24 V constant | Orange (pair 2) | Power supply +24 V | |
| 5 | Common to Net2 plus | Black/green (pair 3) | Net2 plus Exit Button 0V | Common for REX (5–6) and door contact (7–5). The 0V terminals on the board are common. |
| 6 | REX to Net2 plus | Green (pair 3) | Net2 plus Exit | Potential-free NO in Enkel Boks (5–6), «push to make». |
| 7 | Alarm (door status) | Black/brown (pair 4) | Net2 plus Contact | NC loop 7–5: closed = door closed (as «held closed by door»). |
| 8 | Fire | Brown (pair 4) | Fire relay NC (C = +24 V via time relay C) | +24 V = normal. Fire: the voltage drops out. |
| 9 | Lock (open) | Black/grey (pair 5) | Net2 plus Relay 1 N.O. | Dry contact. Relay 1 COM gets +24 V via time relay C and fire relay C. |
| 10 | Night lock (central) | Grey (pair 5) | Time relay NO (C = +24 V) | +24 V = night mode. |
| 11 | Not in use | Blue/white (pair 6) | – (free) | The reader connects directly to Net2 plus. No card reader on 13–16. |
| 12 | Not in use | White (pair 6) | – (free) | |
| – | +24 V to time relay C | Red | Power supply +24 V → Time relay C | Start of the red chain: time relay C → fire relay C → the controller. |
| – | +24 V to lock relay | Red | Power supply +24 V (via time relay C and fire relay C) → Net2 plus Relay 1 COM | Red chain as on the other Teren drawings. |
| – | +24 V power in | Red | Power supply +24 V (via time relay C and fire relay C) → Net2 plus 12-24V | Net2 plus takes 11–24 V DC (+20 %), max 200 mA (p. 8). Takes power from the red chain (dot), like Avigilon SDC. |
| – | 0 V power in | Black | Power supply 0 V → Net2 plus 0V | One power supply: common 0 V automatically. |
| – | Reader 12V / 0V | Red / Black | Net2 plus Reader 1 12V / 0V → Paxton reader | Only 12 V readers (p. 2). The reader ports supply max 500 mA in total (p. 8). |
| – | Reader Data/D0, Clock/D1 | Yellow / Blue | Net2 plus Reader 1 Data/D0, Clock/D1 → Paxton reader | Paxton format or Wiegand. |
| – | Reader LED and Media Detect | Brown, orange, green, violet | Net2 plus Reader 1 Red/Amber/Green LED, Media Detect → Paxton reader | Colour code per Paxton. Cable CR9540, screen to 0V (black) (p. 6). |
In the central
- Red chain: power supply +24 V → time relay C → fire relay C → Net2 plus Relay 1 COM and 12-24V.
- Net2 plus 0V goes to 0 V on the power supply. One power supply: common 0 V automatically.
- Pairs 1–5 are in use: pair k goes to terminal 2k−1 (black/striped) and 2k (colour). Pair 6 (11–12) is free.
- The reader is connected directly to Net2 plus Reader 1 with Paxton reader cable CR9540 (10-conductor, screened), not via Enkel Boks 13–16. The Paxton reader has 8 conductors and therefore cannot be connected through pair 6.
The door side (17–40) is the same as the base drawing – see the drawing, page 1.
Controller setup and DIP in Enkel Boks
| Setting | Factory | Used as | Status |
|---|---|---|---|
| Power 12-24V / 0V | 11–24 V DC (+20 %), PCB max 200 mA (p. 8) | 24 V from the power supply in the central cabinet. Power supply and battery are sized for Net2 plus (≤ 200 mA) and reader (approx. 100 mA) | OK |
| Relay 1 (N.C. / N.O. / COM) | Door relay, potential-free changeover, 24 V DC (+20 %) / 4 A (p. 2, 8) | N.O. → terminal 9, COM = +24 V via time relay C and fire relay C. The lock type (fail safe/secure) is chosen at the door | OK |
| Opening time | Door open time 1 s – 999 999 s (p. 8) | Set in Net2 (Doors). Relay 1 holds K5 in Enkel Boks for as long as it is energised | OK |
| Exit / 0V (Exit Button) | Exit button «push to make» between Exit and 0V (pp. 2–3) | Exit ← 6, 0V ← 5. Enkel Boks provides potential-free NO from the REX button and the inside elbow switch | OK |
| Contact / 0V | Door contact «held closed by door» between Contact and 0V (p. 2) | Contact ← 7 (NC loop 7–5). The 0V terminals are common on the board, so 5 on Exit 0V is enough | OK |
| Relay 2 | Second relay, function set in Net2 | Not in use. Night lock from the time relay in the central cabinet | OK |
| Tamper, PSU, Alarm, Intruder Alarm | Inputs to 0V, alarm output 12 V / 1 A, separate port for intruder alarm (pp. 2, 4) | Not in use | OK |
| Reader 1 (12V, LEDs, Data/D0, Clock/D1, Media Detect, 0V) | Only 12 V DC readers, up to 2 readers/keypads per port, 500 mA in total (p. 2, 8) | Paxton reader directly on Reader 1 with Paxton reader cable CR9540 (10-conductor, screened), max 100 m; 12V and 0V are doubled above 25 m | OK |
| Network | TCP/IP (RJ45) or RS485 (max 1 km, 120 Ω at both ends) to Net2 server (pp. 4–6) | Not drawn. Static IP or DHCP reservation is recommended (pp. 5, 7) | OK |
| Diode across the lock | Not mentioned in ins-30080 | No diode: the Net2 relay controls only the coil K5 in Enkel Boks | OK |
| DIP | Function | Suggestion for this setup |
|---|---|---|
| S2.1 | Tamper | ON (the Net2 Tamper input is not used, tamper in the box not connected) |
| S2.2 | Emergency release, relay 2 (KAC) | OFF when an emergency release (KAC box) is connected to 28–29 (logged as «door open») |
| S2.3 | EOL resistor R2 | ON (Net2 Contact is not balanced; no R2) |
| S2.4 | Magnetic door contact and microswitch | OFF when MKT is connected to 26–27 |
| S2.5 | Door microswitch | OFF when a microswitch is connected to 24–25 |
| S2.6 | Fire – manual mode | OFF when a fire relay is connected to terminal 8 |
| S2.7 | Night lock – manual mode | OFF when the night lock is controlled from terminal 10 |
| S2.8 | Emergency release, relay 1 (KAC) | OFF when an emergency release (KAC box) is connected to 30–31; ON without an emergency release |
Paxton10 Single-Door Controller Gen2 – controller in the central cabinet
The Paxton10 Single-Door Controller Gen2 sits in the central cabinet and runs on the same 24 V power supply as Enkel Boks, and one 6-pair cable (max 100 m) runs to the door. Relay 1 is set to follow the door lock and is a dry NO contact to terminal 9; the powered 12 V lock output is not used. The night lock is controlled by the time relay, and the Paxton10 reader is connected directly to reader port 1.
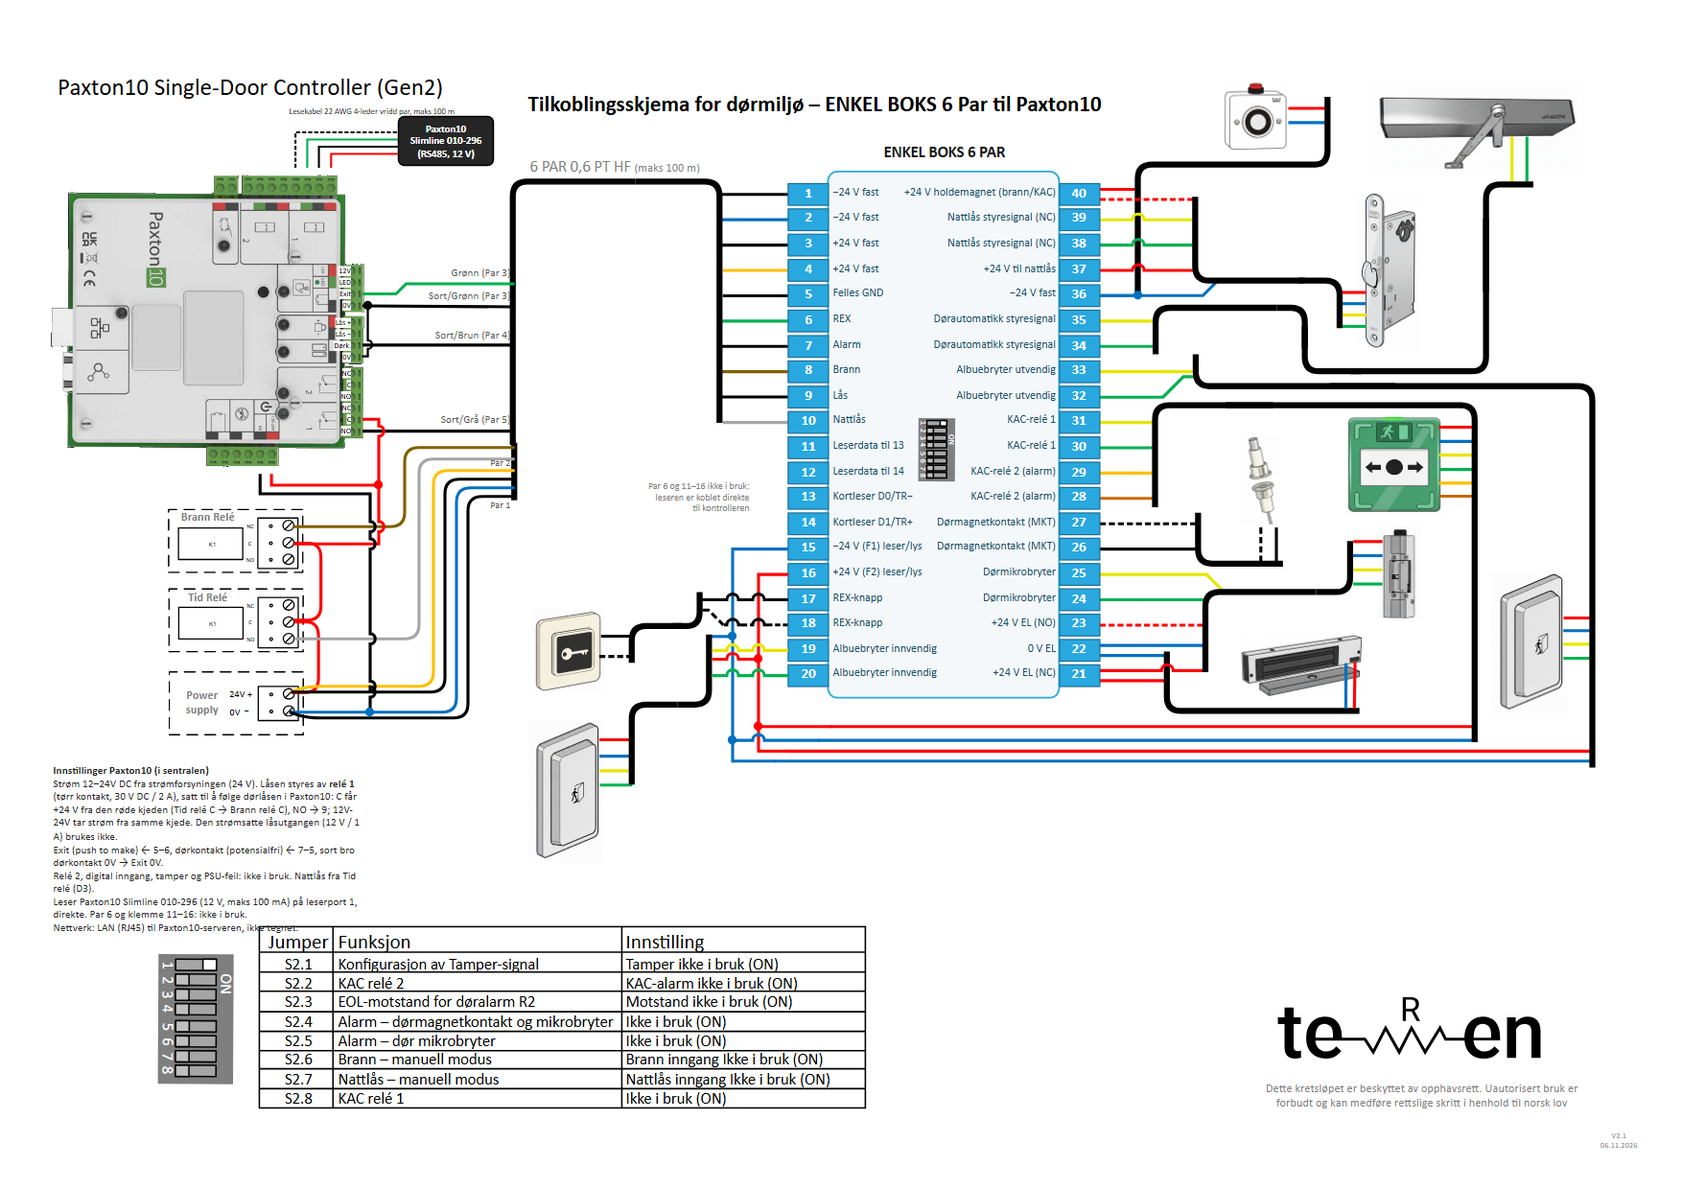
- Lock: Paxton10 relay 1 NO → terminal 9 (Black/grey, pair 5); C gets +24 V via time relay C and fire relay C. Relay 1 is set to follow the door lock in Paxton10.
- The powered lock output (12 V DC) is not used: 12 V does not pull in the coil in the box.
- Inputs: 5 (Black/green, pair 3) → exit button black terminal (0V), 6 (Green, pair 3) → exit button white terminal, 7 (Black/brown, pair 4) → door contact white terminal; black bridge from door contact black terminal to exit button black terminal.
- Power: Paxton10 12V-24V from the power supply (max 108 mA), 0V → the power supply's 0 V. Common 0 V follows automatically.
- Reader: Paxton10 Slimline 010-296 on reader port 1 (red 12V, black 0V, green A, white B), 22 AWG 4-conductor twisted pair, max 100 m.
- Night lock: time relay NO → Grey (pair 5) → terminal 10. Relay 2 is not used. Pair 6 and 13–16 are free.
Connection table (cable journal)
Cables
- 6 PAR 0,6 PT HF (max 100 m): Central cabinet (Paxton10, power supply, fire relay, time relay) ↔ Enkel Boks
- In the central cabinet: Power and bridges in the cabinet
- Reader cable Paxton10 (22 AWG, 4-conductor twisted pair) (max 100 m): Paxton10 reader port 1 ↔ Paxton10 reader at the door (not via Enkel Boks)
One row = one conductor: terminal in Enkel Boks → conductor → where it goes. The tables are translated from the PDF, which is in Norwegian; the PDF is the document to install from.
| Terminal | Function | Conductor | Connects to | Note |
|---|---|---|---|---|
| 1 | −24 V constant | Black/blue (pair 1) | Power supply 0 V (−) | |
| 2 | −24 V constant | Blue (pair 1) | Power supply 0 V (−) | |
| 3 | +24 V constant | Black/or. (pair 2) | Power supply +24 V | |
| 4 | +24 V constant | Orange (pair 2) | Power supply +24 V | |
| 5 | Common to Paxton10 | Black/green (pair 3) | Paxton10 exit button, black terminal (0V) | Common for REX (5–6) and door contact (7–5). Black bridge from the door contact black terminal. |
| 6 | REX to Paxton10 | Green (pair 3) | Paxton10 exit button, white terminal | Potential-free NO in Enkel Boks (5–6), «push to make». |
| 7 | Alarm (door status) | Black/brown (pair 4) | Paxton10 door contact, white terminal | NC loop 7–5 (potential-free): closed = door closed. |
| 8 | Fire | Brown (pair 4) | Fire relay NC (C = +24 V via time relay C) | +24 V = normal. Fire: the voltage drops out. |
| 9 | Lock (open) | Black/grey (pair 5) | Paxton10 relay 1 NO | Dry contact, C = +24 V via time relay C and fire relay C. Relay 1 follows the door lock. |
| 10 | Night lock (central) | Grey (pair 5) | Time relay NO (C = +24 V) | +24 V = night mode. |
| 11 | Not in use | Blue/white (pair 6) | – (free) | The reader connects directly to Paxton10. No card reader on 13–16. |
| 12 | Not in use | White (pair 6) | – (free) | |
| – | +24 V to time relay C | Red | Power supply +24 V → Time relay C | Start of the red chain: time relay C → fire relay C → the controller. |
| – | +24 V to lock relay | Red | Power supply +24 V (via time relay C and fire relay C) → Paxton10 relay 1 C | Red chain as on the other Teren drawings. |
| – | Common for door contact | Black (bridge) | Paxton10 door contact black terminal → exit button black terminal | Bridge on the controller, so 5 is common for both inputs. |
| – | +24 V power in | Red | Power supply +24 V (via time relay C and fire relay C) → Paxton10 12V-24V | 12–24 V DC, max 108 mA without readers (TDS-0047). Takes power from the red chain (dot), like Avigilon SDC. |
| – | 0 V power in | Black | Power supply 0 V → Paxton10 0V | One power supply: common 0 V automatically. |
| – | Reader 12V / 0V | Red / Black | Paxton10 reader port 1 red / black → Paxton10 Slimline 010-296 | Reader output 12 V DC, max 1 A; Slimline draws 40–100 mA (TDS-0011). |
| – | Reader RS485 A / B | Green / White | Paxton10 reader port 1 green / white → Paxton10 Slimline 010-296 | Red 12V, black 0V, green A, white B (label on the board). |
In the central
- Red chain: power supply +24 V → time relay C → fire relay C → Paxton10 relay 1 C and 12V-24V.
- Paxton10 0V goes to 0 V on the power supply. One power supply: common 0 V automatically.
- Pairs 1–5 are in use: pair k goes to terminal 2k−1 (black/striped) and 2k (colour). Pair 6 (11–12) is free.
- The reader is connected directly to Paxton10 reader port 1, not via Enkel Boks 13–16. The powered lock output (12 V) is not used.
The door side (17–40) is the same as the base drawing – see the drawing, page 1.
Controller setup and DIP in Enkel Boks
| Setting | Factory | Used as | Status |
|---|---|---|---|
| Power 12V-24V / 0V | 12–24 V DC; 97–108 mA (TDS-0047). From the factory with its own PSU (24 V AC → 12 V DC 2 A) or PoE in a metal enclosure | 24 V from the power supply in the central cabinet. Power supply and battery are sized for Paxton10 (≤ 108 mA) and reader (≤ 100 mA) | OK |
| Relay 1 (NC / C / NO) | Dry contact 30 V DC / 2 A (TDS-0047). Terminal order NC–C–NO per the symbol on the board | NO → terminal 9, C = +24 V via time relay C and fire relay C | OK |
| Relay 1 as door lock | From the factory the door lock is on the powered lock output; the relays are «spare outputs» (APN-0038) | Relay 1 is set to follow the door lock in Paxton10 | OK |
| Lock output (+ / −) | Powered 12 V DC / 1 A (TDS-0047) | Not in use: no powered output on 9, and 12 V does not energise K5 (24 V coil) | OK |
| Exit button (12V, LED, white, black) | «Push to make» between white and black terminal; 12V and LED for light in the button (INS-01053 p. 2) | White ← 6, black ← 5. 12V and LED not in use (the lights in the elbow switches are powered from the box) | OK |
| Door contact (white, black) | Potential-free input (TDS-0047) | White ← 7, black: bridge to exit button black (5). Unbalanced. Closed = door closed | OK |
| Relay 2 | Spare output; can be set to «Keep on during» a time profile (APN-0038) | Not in use. Night lock from the time relay in the central cabinet | OK |
| Tamper, PSU fault, digital input | Inputs on the board (TDS-0047) | Not in use | OK |
| Reader port 1 (red, black, green, white) | RS485 reader, 12 V DC max 1 A, Paxton readers only; 2 readers per door (TDS-0047) | Paxton10 Slimline 010-296 (12 V, 40–100 mA) directly on reader port 1: red 12V, black 0V, green A, white B; 22 AWG 4-conductor twisted pair, max 100 m (TDS-0011) | OK |
| Network | LAN (RJ45) to the Paxton10 server; RS485 port for Paxton connectors (24 V DC, 750 mA) | Not drawn | OK |
| Diode across the lock | Not mentioned | No diode: relay 1 controls only the coil K5 in Enkel Boks | OK |
| DIP | Function | Suggestion for this setup |
|---|---|---|
| S2.1 | Tamper | ON (tamper in the box not connected) |
| S2.2 | Emergency release, relay 2 (KAC) | OFF when an emergency release (KAC box) is connected to 28–29 (logged as «door open») |
| S2.3 | EOL resistor R2 | ON (the door contact input is potential-free, no R2) |
| S2.4 | Magnetic door contact and microswitch | OFF when MKT is connected to 26–27 |
| S2.5 | Door microswitch | OFF when a microswitch is connected to 24–25 |
| S2.6 | Fire – manual mode | OFF when a fire relay is connected to terminal 8 |
| S2.7 | Night lock – manual mode | OFF when the night lock is controlled from terminal 10 |
| S2.8 | Emergency release, relay 1 (KAC) | OFF when an emergency release (KAC box) is connected to 30–31; ON without an emergency release |